Recipe

Homemade Sourdough Starter From Scratch | Day 1 to Day 14
Homemade Sourdough Starter From Scratch | Day 1 to Day 14
Scale
Ingredients
- Easy Beginner-Friendly Sourdough Starter Using Just Flour and Water
- Making your own sourdough starter from scratch is easier than you think! With just two simple ingredients a little patience, and daily feeding, you can create a natural sourdough starter without using commercial yeast.
- I’m going to walk you through my sourdough starter process from Day 1 all the way to Day 14, including when to start discarding, how to recognize activity, and when your starter is finally ready for baking.
Instructions
- Ingredients
- Bread flour
- Water (filtered if needed)
- Equipment
- A small bowl or glass jar
- Wooden spoon
- Loose-fitting lid, plastic wrap, or clean cloth
- A larger glass jar for later feedings
- Kitchen scale (recommended for accurate measurements)
- Days 1–7: Building Your Sourdough Starter
- The first seven days are all about introducing flour and water and allowing fermentation to begin.
- This is the small-batch method I started with. Because teaspoons of flour and water don’t weigh the same, the early measurements are approximate. Once the starter grows, I recommend switching to equal weights for more consistent results.
- Day 1: Let’s Get Started!
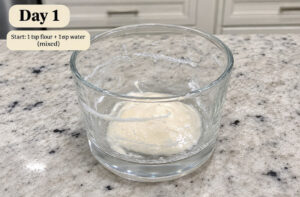
- Ingredients:
- 1 heaping teaspoon bread flour
- 1 teaspoon water
- In a small bowl, combine the flour and water using a wooden spoon. Mix until everything is incorporated.
- When I say a heaping teaspoon, I mean allowing the flour to overflow slightly above the spoon.
- Scrape everything toward the middle of the bowl, loosely cover, and place it in a warm area for 24 hours.
- Your water doesn’t necessarily need to be filtered. Most drinkable tap water works perfectly fine.
- Day 2: Patience Is Key!
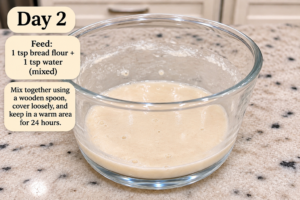
- Add:
- 1 heaping teaspoon bread flour
- 1 teaspoon water
- After 24 hours, uncover your starter.
- You probably won’t notice much happening, and that’s completely normal!
- Add the flour and water, mix well with your wooden spoon, and scrape everything toward the center.
- Cover loosely and allow it to rest in a warm area for another 24 hours.
- Don’t expect your starter to become bubbly overnight. Every starter develops at its own pace.
- Day 3: Are You Seeing Bubbles?
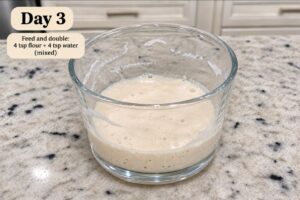
- Add:
- 2 heaping teaspoons bread flour
- 2 teaspoons water
- By Day 3, you might start noticing small bubbles or some activity.
- If not, don’t worry!
- Mix everything together, cover loosely, and let it rest for another 24 hours.
- Day 4: Building More Activity
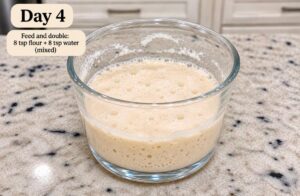
- Add:
- 4 heaping teaspoons bread flour
- 4 teaspoons water
- Your starter might start showing more bubbles or even rising slightly.
- Some starters become very active during these early days and then suddenly slow down. This is normal because the microorganisms are still developing.
- Mix, cover loosely, and rest for another 24 hours.
- Day 5: Trust the Process
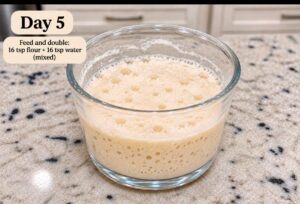
- Add:
- 8 heaping teaspoons bread flour
- 8 teaspoons water
- You may start seeing bubbles throughout your starter.
- Remember, activity doesn’t necessarily mean your starter is ready for baking.
- Continue mixing and keeping your starter in a warm area for another 24 hours.
- My tip: If your starter is becoming too large, you can begin discarding some before feeding. Discarding earlier is also perfectly fine.
- Day 6: Is Your Starter Growing?
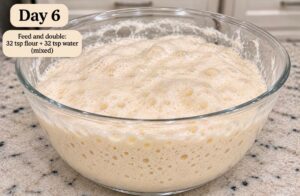
- Add:
- 16 heaping teaspoons bread flour
- 16 teaspoons water
- By now, I’m hoping you’re seeing some activity!
- If your starter hasn’t doubled or isn’t bubbling much, don’t panic.
- Sometimes it takes longer for the wild yeast and beneficial bacteria to establish themselves.
- Mix everything together and allow it to rest for another 24 hours.
- Day 7: Is Your Sourdough Coming to Life?
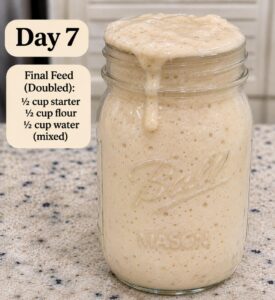
- Original small-batch feeding:
- 32 heaping teaspoons bread flour
- 32 teaspoons water
- By Day 7, you might need to transfer your starter into a larger container.
- Ask yourself:
- Are you seeing bubbles?
- Is your starter rising?
- Is it doubling in size?
- Does it rise and eventually fall?
- These are the signs we’re looking for!
- However, because these large teaspoon measurements don’t provide equal weights of flour and water, I recommend switching to the measured feeding method below instead of continuing to increase the amounts.
- Recommended Day 7 feeding:
- Keep 50 grams of starter and discard the rest. Add 50 grams of bread flour and 50 grams of water. Mix thoroughly.
- Cover loosely and let it ferment for 24 hours, checking its activity along the way.
- Don’t be discouraged if your starter isn’t ready. Mine has taken nearly two weeks before!
- Days 8–14: Discarding, Feeding, and Strengthening Your Starter
- Now we’re moving into one of the most important parts of making sourdough.
- It’s time to establish a consistent discard-and-feed routine!
- Discarding is important because it helps control the size of your starter, prevents excessive acidity, and gives the microorganisms a fresh supply of food.
- Sourdough naturally contains beneficial bacteria, so discarding isn’t simply about removing dangerous bacteria.
- Day 8: Start Your Discarding Routine
- Ingredients:
- 50 grams existing sourdough starter
- 50 grams bread flour
- 50 grams water
- Discard all but 50 grams of your starter.
- Add the fresh flour and water, then mix until everything is incorporated.
- Transfer to a clean jar if needed, mark the starter’s level, cover loosely, and leave it in a warm area.
- Watch what happens over the next 24 hours.
- Your starter may begin rising and then falling as it uses up its food.
- Important: Don’t use discard from a young, immature starter in recipes yet.
- Day 9: Watch for Activity
- Repeat the same feeding:
- Keep 50 grams starter
- Add 50 grams bread flour
- Add 50 grams water
- Mix everything together and cover loosely.
- Watch for bubbles, expansion, and a slightly tangy aroma.
- If your starter isn’t doubling yet, that’s okay. Continue feeding consistently.
- Day 10: Getting Stronger!
- Repeat your daily discard and feeding.
- By now, you may notice your starter rising more predictably after feeding.
- A healthy starter should gradually develop a pleasant fermented aroma.
- It might smell tangy, fruity, or slightly yeasty.
- If you notice fuzzy mold or pink or orange discoloration, discard the entire starter and begin again.
- Day 11: Is It Doubling?
- Continue with your daily feeding.
- Here’s where things start getting exciting!
- You may notice your starter doubling within several hours after being fed.
- That’s a great sign, but don’t rush into baking just yet.
- We want to see consistent activity, not just one successful rise.
- Day 12: Building Consistency
- Repeat your feeding routine.
- At this point, pay attention to how long it takes your starter to double.
- Ideally, it should reliably double within approximately 4–8 hours after a 1:1:1 feeding at a warm room temperature.
- If it rises and falls predictably, you’re getting closer!
- Day 13: Almost There!
- Continue discarding and feeding.
- Your starter should be developing a more predictable pattern.
- Look for plenty of bubbles, a noticeable increase in volume, and a pleasant fermented smell.
- If your starter is still sluggish, don’t worry. Continue the process for a few more days.
- Day 14: Is Your Sourdough Starter Ready?
- Congratulations! You’ve made it through two weeks of sourdough starter feeding!
- But remember, Day 14 isn’t a guaranteed finish line.
- Your starter is ready when it consistently demonstrates the strength needed to raise bread.
- Signs your starter is ready:
- It reliably doubles in size within approximately 4–8 hours after feeding.
- It has bubbles throughout.
- It rises and eventually falls in a predictable pattern.
- It smells pleasantly tangy or yeasty.
- It has shown consistent activity for several consecutive feedings.
- If your starter is doing all these things, you can begin experimenting with homemade sourdough bread!
- If not, keep feeding it. Some starters need longer than 14 days.
Connie’s notes
My Best Sourdough Starter Tips 1. Patience is everything. Don’t compare your starter to someone else’s. Temperature, flour, water, and feeding schedules can all affect fermentation. 2. Bread flour works great. I prefer using bread flour for my sourdough starter. Whole wheat or rye flour can also help encourage fermentation. 3. Keep your starter warm. A temperature around 75–80°F is a good starting point. Avoid excessive heat. 4. Filtered water isn’t always necessary. Most drinkable tap water is fine. If your water is heavily chlorinated, filtered water may help. 5. You don’t need fancy equipment. A simple jar and spoon are enough. I personally enjoy using a wooden spoon. 6. Don’t seal your container airtight during active fermentation. Use a loosely fitted lid or covering that allows gas to escape while protecting the starter from contamination. 7. Discarding helps maintain balance. Although my original series begins with very small feedings and no discard, I recommend establishing a regular discard-and-feed routine as your starter grows. 8. Equal weights work best. For consistent results, weigh your starter, flour, and water rather than relying on equal cup or teaspoon measurements. 9. Bubbles don’t automatically mean it’s ready. Early fermentation can create plenty of bubbles before your starter is mature enough to raise bread. 10. Don’t give up after seven days! Some starters take 10 days, others take 14, and some take even longer. Frequently Asked Questions Can I use my sourdough starter on Day 7? Possibly, but only if it has developed a stable fermentation culture and consistently rises after feeding. A bubbly seven-day-old starter isn’t automatically ready. Why isn’t my sourdough starter doubling? Temperature, feeding ratios, flour type, and the age of your starter can affect its activity. Continue feeding and give it time. Do I have to discard my starter? Regular discarding is recommended for maintaining a small starter with consistent feeding ratios. It’s especially useful once your starter begins growing. Can I use sourdough discard from the first week? I don’t recommend using discard from a young, immature starter. Wait until your starter is reliably established before using discard in recipes. What happens if my starter takes longer than 14 days? Nothing is necessarily wrong! Keep feeding and monitoring it. A starter isn’t ready based on its age alone. Does sourdough contain gluten? Yes. Traditional wheat-based sourdough contains gluten. Fermentation can change some components of the dough, but it does not make wheat sourdough safe for people with celiac disease. Final Thoughts Making sourdough from scratch is more than just following a recipe. It’s learning how fermentation works and understanding that every starter develops differently. I remember thinking my first starter was a failure because it wasn’t ready in seven days. But once I gave it time, everything started coming together. That’s why I always tell my followers: Patience is key! Don’t rush the process. Don’t get discouraged when you don’t see bubbles. And most importantly, don’t give up. With just flour, water, and a little consistency, you can create your very own sourdough starter right at home.
Did you make it?
Ratings help other people decide whether to try it — and they tell me which recipes are worth doing more of. It takes ten seconds.
↓ Leave your rating